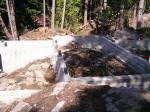
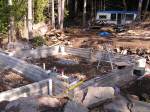
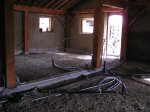
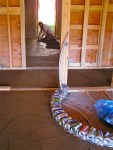
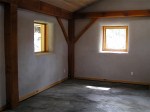
We built our house on the top section of a bedrock slope – a perfect place for anchoring the house to a solid mass. The concrete stem walls are pinned directly to the rock in a way that reaches around and flows over the various natural undulations that existed, allowing us to avoid any blasting. At the south side, where the slope falls downwards, the cavity in which we back filled with shale was about 8 feet deep, and on the north wall side, it was only 2 feet. An earth berm set back from the over hang of the roof lifts another 2 feet the length of the north wall, providing a small shawl of soil around the chilly side. We had learned from Michael Reynolds and his design features that the planet Earth is a thermally stabilizing mass that delivers temperature without wire or pipes, and we wanted intuitively to be connected to that constantly warm, grounding energy. “The outer few feet of the earth heats up and cools off in response to surface weather. However, deeper in the earth, about four feet and beyond, the temperature is more constant (around 58 degrees). Here, the earth can be used to both cool and stabilize temperature if the home is appropriately designed.” earthship.com/comfort-in-any-climate. So the fill of local shale went in, packing solid down to the bedrock below. While it is not a true tapping in to the mass temperature of the earth, (instead of digging down, we filled the ground in below us) it felt better than an awkward crawl space and manufactured insulation. On top of the shale went our vapour barrier of plastic, on to which we needed (by code) a layer of insulation. Most common here is the pink foam board, but we looked around and found that mixing agriculture grade perlite with a modest amount of concrete (6 shovels perlite to 1 shovel concrete) and laying it 4 inches thick gave us the same value to code as the pink stuff. We could also neatly pack it in around all the water pipes that we put down on the plastic layer. We were able to easily anchor the hydronic in-floor heating pipes to the perlite layer before we continued up with a 3 inch thick cob slab as a sub floor. We had a bobcat mix all that up for us and we hauled it in and trowelled it in place as level as we could get it. Our original plan at that point was to finish it off with an earthen floor everywhere except in the kitchen, bathroom, mudroom and utility room, where we would tile instead. Our search for cheap tile however, was fairly unsuccessful, as was our search for a trusted earthen floor recipe and method description. Our time was being pushed as was our wallets, and at some intersections of journeys, there come times when priorities begin to change places. Our three years in the trailer was wearing us thin, and with Colin back at work to uplift our bank account, time became scarce as well. Accomplishing 800 square feet of earthen floor became daunting and expensive as we waded through the estimates of finishing oil and wax, kaolin clay and stucco sand. Then I stumbled upon a place in Vancouver that was selling ecologically certified cork flooring at a ridiculous cheap price compared to other prices we had collected, so we put in an order that would cover all but the very front south facing room. Colin was determined to make an attempt at an earthen floor in the room that receives all the passive solar sun, so as to keep the principle of mass heating intact without too much expense and time. The cork flooring was beautiful to install- an interlocking system that floats above the subfloor, allowing for expansion with the temperature fluctuations of the in-floor heating. Of course, because the cork was not as thick as we had planned for with the earthen floor, and the sub floor not at all level enough for cork tiles, we had to trowel an inch of concrete on to the whole area. The cork floor is durable and flexible, warm and soft on the feet. The earthen floor section was indeed another journey of experiment, a journey which I will write about in another post dedicated entirely to the process of the art of earthen floors. We are glad to have only done the one small section, but we are also excited about repeating the process in the second half of the house. It is wonderful to have the opportunity to test the methods that we are choosing on this half of the house, so we can learn from our experiences and navigate with more knowledge for the second half of the house.
-

- south drop off
-
- the mid section
-
- the north section with set back earth berm
-

- foundation walls on bedrock
-
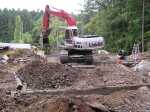
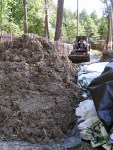
- back filling with local shale
-
- plumbing layout
-
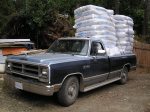
- a pallet of perlite
-

- mixing perlite concrete in a trough
-

- dumping the mix
-
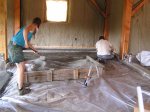
- layering over the vapour barrier
-

- courses of in-floor heating tubes
-
- bobcat cob
-
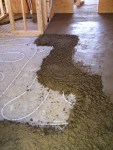
- In floor heating tubes covered by 3 inches of cob sub floor
-
- drying cob sub floor (cracking is fine)
-
- concrete layer under cork section
-

- cork floor in the art studio
-

- scribing around the fidgety areas
-
- cork flowing through all the rooms


Nov 28, 2011 @ 14:43:54
What a wonderful blog and record of your adventures! Do you mind my asking where you got your cork flooring?
Nov 29, 2011 @ 22:13:21
Thank you! We got the cork flooring from http://www.corkfloorsales.com in Vancouver. They have a warehouse from which they will ship flooring to different terminal stores. The cheapest option is to pick it up yourself. Sounds like you are also on an exciting adventure! I really appreciated the vast amount of links that I found on your site.Cheers!
Aug 06, 2012 @ 17:51:08
Hello, we’re on Year IV of building our earthship in the interior of BC. http://www.darfieldearthship.com or FB page The Darfield Earthship. We are just getting ready to lay our radiant floor heating system and we are leaning to a perlite insulating layer, having used this as the base for our rocket stove. My husband is an engineer and has been doing calculations on the perlite R value, so seeing your post The Layers Beneath our feet, was very encouraging to us. We do wonder how far the 6 shovels perlite to one shovel concrete goes in terms of coverage at 3″. We have a fairly large floor to do (about 1400-1500 square feet) and although we have a good source of perlite for small projects, this would be much bigger. Any thoughts? Thanks for the info…when building any alternative or natural building (or combination) I find that we all glean what we need from each other…lovely to be able to share information! Thx Sandra Burkholder/Chris Newton.
Feb 10, 2019 @ 23:08:29
How is the floor holding up? Any cracking/settling? I am very curious about using perlite but cant find any information about its compressive strength so I’m hesitant.
Feb 14, 2019 @ 19:45:04
Hello Ken,
The earthen floor is holding up very well. It has some scuffs and whatnot just from surface use, and we haven’t waxed it at all since we put it in so it has lost it’s shine (we plan to do this again when have a few days when we will not be in the house for it to dry).
We used perlite again as the sub-floor in our straw bale addition, but used the perlite in a different way as directed by new building codes( and building inspector) as well as new standards for using perlite bags whole under the concrete slab on grade. The best source for information on using perlite is the Perlite Institute (perlite.org), their website is a wealth of information so you might find what you are looking for around compression strength there. Here is the link to the page on using whole perlite bags as we did for the second half of the house (there is also a article on how we did this on inspirational village site as well) https://www.perlite.org/wp-content/uploads/2018/03/perlite-underslab-insulation.pdf Hope this helps you out!
Wendi and Colin