 This summer, we have finally completed the last layers of the inside wrap of the house, including all the flooring and the final coat of clay based plaster on all the walls. This last layer of clay plaster was much more particular in recipe and in application than the rest of the rough layers, and calls for it’s own chapter in explanation. (I have already outlined the procedure for the rough coats of plaster in a previous posting, Natural Plaster.) I would like to express my understanding of our process in openness to the many other recipes, methods, and materials that have been used with success throughout time and in many different places.
My experience is limited to our one house here on the west coast of Canada. However, we have also been guided by our friend Tracy Calvert who has compiled her own knowledge and experience and has willingly and generously passed it on to us throughout our journey. The ingredients in the recipe that we used are kaolin clay, stucco sand, fine straw, whiting (calcium carbonate), paper pulp, rice flour, and a small amount of borax and white glue. The Kaolin clay is a fine powdered porcelin clay that was purchased at a pottery supply store, as well as the whiting, which is basically a chalk filler.
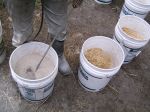
 We used finely chopped straw left over from baling, but we also used an alternate fiber material of bulrush down, the fluffy insides of cattail heads harvested before they turn inside out. The sand is just fine washed stucco sand, and the rice flour is mixed with hot water and made into a glutinous paste. We soaked newspaper overnight and then pulped it up with our paddle mixer, which we used to make the plaster in buckets. Ratios are as follows : 6 parts sand, 4 parts clay powder, 2 parts whiting, 1 part straw, and 2 parts paper pulp, 3/4 part rice flour mix, a handful of borax, and two or three glugs of glue. One part for us was a 1 1/4 litre bucket. First we dry mixed in 5 gallon buckets the sand, clay, whiting and straw, then added the paper pulp and enough water to make the mix spin easily but stiffly.
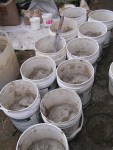
 Because we were going to wait to plaster the next day, we left the mixes at this stage overnight. When we were ready to plaster, we added the rest of the ingredients and any colour pigment we were using, then compiled three of the buckets into a big tub and mixed them thoroughly together. This helps with consistency of ingredient quantities as well as getting the bottoms of the buckets mixed in well. For colour pigments, we did some test samples using tablespoons of pigment to 1 litre of mix, then allowed the samples to dry to the finish shade. We then multiplied the tablespoon quantity for the amount of litres in the 5 gallon buckets (some estimating was definitely relied upon) and added that amount of tablespoons of pigment per bucket.
  Finally we were ready to put it on the walls! We sprayed the walls with water to help bond the two layers together, then considered how to plaster each section without stopping or ending up with long edges of plaster that are left a little too long and begin to dry out. Unlike the regular clay plaster, there is only so much re-wetting that the plaster can take before it is too difficult to smoothly work new plaster up to it without leaving lines or smudgy areas. This sensitivity to time makes considerations of temperature and air flow quite important, and usually requires two or three people working together for smooth going. We had two of us plastering, and one person in charge of mixing up new mixes, moving ladders, bringing coffee, keeping the music flowing, and generally making it possible for us to keep working our lines until a section is done. We spent almost five days in total plastering the whole inside of our house, which worked out to be about 1200 square feet of wall and used approx. 27 buckets of mix (one mix being one recipe.) We used japanese trowels, bought through the internet, and homemade hawks (rectangles of plywood with a handle on one side), as well as a few smaller tools for tight corners and edges, and yogurt lids with the rim cut off for shaping curves. Generally, we covered an area with overlapping rainbow swipes, then flattened them all down in larger sweeping motions. We plastered over drywall as well, which we had prepared with glue and sand to provide a grippy surface.
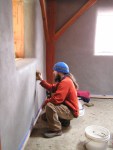
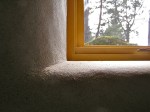
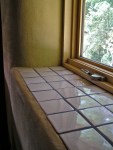
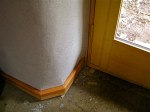
 All the kickboards and window and door trim were put in place first so that the final plaster came to meet the trim and seal any spaces. We also tiled the sills of some of the windows before hand. At a certain time of dryness, we went over the whole wall with a damp sponge to blur any lines and troweling marks, then at another certain point in dryness we burnished the whole wall with a yogurt lid. This brings up the clay and pushes in any sand, and gives the plaster a certain polish that makes it more durable and smooth.
 We are so happy about our earthen walls, from the clay slip through the rough coats and finally plastered with the finished layer. I began this house knowing absolutely nothing about natural plaster, and although it took lots of work and patience, it provided a full scope of learning the art of earthen plaster. There is always more to learn, and I look forwards to continuing on and developing my methods and skills throughout the second half of the house. I am so very grateful to Tracy for leading us on this path and providing support as well as space for us to take it on and call it our own. The passing on of this type of skill is important to her as we share and expand our self- sustaining abilities for building beautiful and healthy homes.
-
- dry mixing in buckets
-

- staw, sand, Kaolin clay and whiting
-

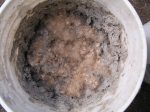
- adding paper pulp and water
-
- cattails as fiber
-

- the mixing zone
-

- adding colour to the big tub
-

- tools for the job
-

- colour sample board
-
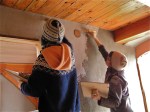
- applying the plaster
-

- burnishing
-
- sponging


Sep 23, 2011 @ 06:19:50
Ah, so can you come help us plaster????? Thanks for the details and photos. I might call with some more questions soon…
Jun 08, 2013 @ 16:39:04
Hi, can you tell me what “whiting” is? I usually just use 2 parts sand and one part caustic lime and spread is one with a gloved hand on my cob building. However, it is chalky after and you can’t rub against it or it comes off on the clothes. Your plaster looks smooth and not chalky. Beautiful.
Jul 09, 2013 @ 01:02:38
Hi Lydia! Whiting is really just calcium carbonate, which is also chalk. In the pottery world it is referred to as whiting, and at first we were buying it from a pottery supply store. However I have more recently used calcium carbonate and bought it from agricultural supply stores as it is used to make lines on fields (like at schools…) It is a lot cheaper this way and really it is just a filler in the recipe. I haven’t experienced any rubbing off, except when there is colour pigment in the mix, then the colour ends up on clothing, but if there is no colour it seems to be fine. Sorry for such a delay in responding! I hope this helps.
Jan 16, 2016 @ 14:16:15
Gorgeous! We ate about to plaster our adobe house. Any tips on making those trim and window details so clean? Did you tape the wood at all? Or use lathe to bullnose corners?
Jan 17, 2016 @ 02:39:19
We taped all the wood trim, and carried clean damp rags with us at all times! The corners are all shaped by trimming the bales, and shaping throughout the previous layers of plaster. The final plaster is simply 1/4 inch thick on top of the previous coat, which varies in thickness to get the desires curve. The Japanese trowels that we used make the lines clean and sharp, I highly recommend them. Good luck with your place!