Back in May (2011) we decided to get going on the final lime plaster of the outside of the house before the business of summer cob building took over. Lime prefers to have cooler temperatures in which to dry, and requires much more attention to the timing of the drying process for a result of eveness of colour and trowel lines. Much like the process of applying the cayolin clay plaster on the inside, lime needs to be troweled on continually until a whole section can be completed, otherwise an apparent line will be visible where the plaster dried too fast, or where troweling stopped.
  There are techniques to make these lines look less visible if whole big sections are difficult to complete in one go at it. We added a beveled line that undulates around the house, dividing the wall into smaller sections and providing a place for us to stop. That way we were able to plaster only the top section, and then only the bottom, and have the line of plaster meet under the bevel and so be hidden.

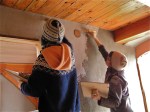
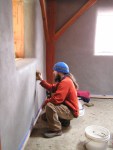
moving along in a team of three
Working with three people who are competent with the job is important. Fixing spots as you go, running out of plaster when you need it, and being too late for the sponging part of plastering is stressful. So is having the sun come out unexpectedly and not being able to stop to find a way of shading the work space. Likewise, having lunch, snacks, and drinks being made available while working is a huge bonus in making lime plastering a smooth and fun thing to do.

getting those mixing muscles flexing
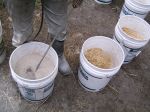
The right tools are also necessary. We used Japanese trowels, hawks (easy to make-plywood board with a handle on one side), just like with the interior plaster, and mixed the plaster in 5 gallon buckets and then in a large tub for uniform colour and consistency. A powerful drill with a paint mixer attached, measuring spoons and cups (depending on colour pigment used), a spatula, and big scooper are helpful to have on hand. Ladders or scaffolding should be close by for high parts.
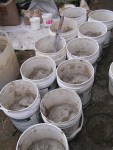
The ingredients are simple- hydrated lime, stucco sand, water, and colour pigment. We soaked the lime in a big barrel a few weeks in advance. We also did many colour samples using a one litre mix, adding pigments in increments of tablespoons to get an array of shades and colour blends. We have many beautiful arbutus trees framing the house, and we wanted to make a colour that brought out a reflection of the deep red/orange/brown that we see in the twisting branches. We also thought that such a colour would bring out the vibrant yellow of the yellow cedar window frames. Red pigment, however, has pink tendencies, and so we ended up using ten tablespoons of red in a one litre mix, plus five tablespoons of chestnut brown. Multiplying that up to 4 gallons in a bucket, and we were deep into a large quantity of pigment. We ordered what we thought would be enough for the whole house, based on calculations for the area covered per bucket on the inside, but discovered partway through the job that we had only enough for just over half the house.  We spent way more money on colour pigment than we ever expected, but we were committed to the colour. Lesson #1: estimating for natural plasters is difficult, and calculating for colour pigments is even more complicated. Lesson #2: find a good source of affordable, bulk colour pigments. Because we were pushing to get this job done while the weather was still cool, we just walked in to a concrete supply store and bought mortar pigments that come in small bags. When we discovered just how much we would need, we didn’t want to take the time to find a different source because different pigments have different colour shades. We would have needed to do the colour sampling all over again. By the time we ran out and needed more though, I was very much wishing that we had. However, in the end we spent about $800 in the final outside layer (incl. lime and sand), and compared to other forms of siding or paint, we have a beautiful plaster that soaks in to the landscape, accentuates the curves of the bales and the coziness of the forest, for probably less money in the end.
 The very first thing we had to do, before any of the plaster went on, was to add the sculptural elements to the rough coat. Elemental it was, too – the aspect of the house is situated very close to the four directions, and we wanted to acknowledge the directions and the elements on each side of the house.

south sun
We sculpted a large sun on the south side for fire, and a water lily on the west side for water. My mom got to work on sculpting a tree on the north side for earth, and I placed two dragonflies on the east wall under the light that shines beside the front door for air. Our beveled relief line that undulates through the middle of the wall flows through each of the elemental sculptures and adds a subtle shadow line. The sculptures were made using the same mix as was used for the brown coat of the walls- 1 part clay, 2 parts sand, and 1 part chopped straw. Fine sand and clay sifted free of rocks makes the plaster easier to shape. We also wet down the wall and spread clay slip over the area to help with adhesion.

mixing lime, sand, and pigment
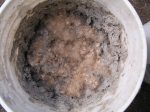
Lime plaster: 1 part lime, 3 parts sand. For us, this meant 5 litres lime and 15 litres sand. That is what we could mix in one 5 gallon bucket. Spin it together with the mixer, and add colour pigment, mixing it in with a small amount of water. Then we turned three buckets into the big tub and mixed them all together. We worked out of this tub until we got low, then had our extra person work on mixing up more.
 Before we started on the walls, I went around and plastered the sculptural areas first, thinking that it would make plastering the walls faster to do rather than having to do the intricacies at the same time as keeping ahead of the drying plaster. Two were done in white, and two were done as the same colour as the walls. What I discovered was this was not as straight forwards when it came time to do the walls. Red pigment, as well as splatter from the rough coat of clay as it was being sprayed with water, got all over the finished sculpture and needed cleaning and touching up afterwards. Also, it was hard to sponge the plaster without touching the already plastered areas, which made the transitions between the two look smudgy. From a distance, it is not a big deal at all, and since this is the outside, we usually look at it from a certain distance. So I recommend doing it all at the same time- just consider simple sculpture lines and expect to be slowed down considerably when plastering these areas. Small tools are essential, as well as the all useful yogurt lid with the rim cut off.

sponging- making the finish texture smooth and uniform
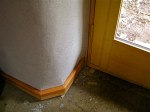
The sponging part of the process comes when the plaster is tacky enough to leave finger prints but dry enough that no plaster comes off onto the fingers. It can be a very precise moment, depending on the weather and how fast the plaster may be drying. A damp sponge is simply moved around in circles to remove the troweling marks and give a smooth, uniform look to the whole wall. Sponging too soon will pull at the plaster too much, and sponging too late means that the sponge needs to be wetter and a stronger motion is needed to smooth out the trowel marks. A well troweled wall, however, won’t have very many marks to be eliminated. We noticed that sponging on a too dry wall caused a variation in the colour pigment, making it a lighter shade, just like when we sponged near an already plastered spot and brushed up against it.

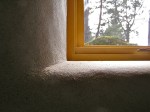
final plaster layer is about 1/4 inch thick
Our process went pretty smoothly. Colin and I mixed what we needed for the day and did the troweling with a friend who pre-sprayed the wall sections ahead of us with water, sponged along behind us when the plaster was ready, and helped remix some of the plaster from the bottoms of the buckets when it began to dry out too much. Getting familiar with the perfect consistency is learned simply through using the plaster, and noticing when it is too dry and difficult to spread or too wet and sliding off the trowel.

the art of troweling is challenged when ladders and awkward spaces need to be reached
The motion of getting it from hawk to trowel to wall is also a practiced motion that comes with repetition. Generally, I would make lots of little overlapping rainbow swipes over a one foot square area, and then smooth the whole area down in larger swipes right away, and move on. No putzing allowed! Get it on, flatten it out, and move on. Plastering a whole house gives lots of opportunity for repetitive motion learning… start with the most hidden space and do the area around the front door last.

dragonflies at the front entrance
There are many details and considerations with lime plaster, and it is helpful if you have experience with some other form of earthen plastering, or if someone who does can give a hands-on lesson. Again, we had the direction of Tracy Calvert, who has been building naturally since the 1980’s and has specialized in earthen plasters. She has led many workshops and believes that skills of natural building are to be available for anyone willing to learn, like the traditional practices passed down from cultures around the world that enable the reality of shelter for everyone in a community and not only for the wealthy.

north tree

west water lily