Despite a very frigid December (for the west coast), we managed to continue building just in time to get the roof sealed up and water tight before the wet west coast winter starts in. Here is a brief account of the structure of the frame, and the way in which we are going to insert the straw bales.
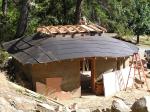
 Our decision to use a stick frame method as opposed to a timber frame (as we did for our first house) was mostly a compromise of time and money. Stick framing is super fast, and we hired an experienced framer friend (thanks Danny!) to work with Colin and his design with the curved roof lines. Dan helped Colin put his drawings into a model of the house in Sketch-Up, a computer program for architecture, so they could get accurate measurements for all the framing, especially where the lengths of the 2×4’s change subtly with the curves. The curved roof was the main reason to use stick framing- it was eaiser and faster to frame the studs under the curved beam which is essentially two 2×8’s (cut out of 2×10’s to get the curve) overlapping all along as one continuous header the length of the roof- this also alleviates the need for headers over doors and windows. Framing started on December 2, and was done in a month, despite a week break over Christmas. We still have some interior shear walls to frame, as we were focused on the walls that were necessary for the roof. Also, window and door framing will be cut in sometime in the spring. Many people have asked us about how 2×4’s can be the only thing holding up a living roof, but the engineer says they are strong enough with the 3×8 beam on top.


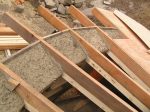
The exterior walls are framed to 18 inch centres, as we will be standing the bales on end between the 2×4’s. A lengthwise notch will be cut down each side of the bales to fit them snug around the framing, and thus hide the wood frame down the centre of the wall of bales. The new international building code for straw bales has published findings that the bales placed 14 inches wide in the wall is the same insulation value as their 18 inch wide option, due mostly to the orientation of the straw.
All of our interior walls are shear walls (plywood on one side, and attached to the foundation directly), as required by the engineer, since our exterior walls are straw bales and not considered to have any shear strength. The shear strength is the load that an object is able to withstand in a direction parallel to the face of the material, as opposed to perpendicular to the surface. In walls, it is usually plywood or cross bracing that provides the shear strength, preventing any side to side movement. So our internal walls are (or will be) sheeted with plywood and continue down to the foundation. At the foundation, the walls are secured with hold downs to resist any upwards movement in an earthquake.


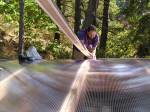
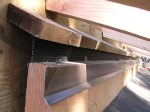
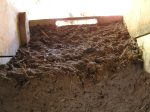
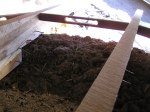
The roof is standard construction with 2×4 strapping over 2×12 joists, though in the more curvy parts of the roof we had to use double layers of 1×4. On top of the strapping is standard 1/2″ plywood decking and a 4″ curb all around the edge to keep the dirt in. We decided to go with a double layer torch on roof membrane this time, which should easily last a very long time, longer than us… The roof was torched on in early January and we are now secure and dry for the rest of the winter. Colin is back to work in his shop for the next few months to get caught up with his ThujaWoodArt projects, but come the spring we hope to do the infloor heating and plumbing under the concrete slab on grade subfloor, and prepare for installing the straw bales in the summer. We will be offering workshops for installing the straw bales and plastering in the summer through the local Heartwood Folk School, check their website for more info as we get closer!